


With the rapid evolution of machine learning (ML) in the last few years, it’s become trivially easy to begin ML experiments. Thanks to libraries like scikit-learn and Keras, you can make models with a few lines of code.
But it’s harder than ever to turn data science projects into meaningful applications, like a model that informs team decisions or becomes part of a product. The typical ML project involves so many distinct skill sets that it’s challenging, if not outright impossible, for any one person to master them all — so hard, the rare data scientist who can also develop quality software and play engineer is called a unicorn!
As the field matures, a lot of jobs are going to require a mix of software, engineering, and mathematical chops. Some say they already do.
To quote the unparalleled data scientist/engineer/critical observer Vicki Boykis in her blog Data science is different now:
What is becoming clear is that, in the late stage of the hype cycle, data science is asymptotically moving closer to engineering, and the skills that data scientists need moving forward are less visualization and statistics-based, and more in line with traditional computer science curricula.
Why data scientists need to know about DevOps
So which of the many, many engineering and software skills should data scientists learn? My money is on DevOps. DevOps, a portmanteau of development and operations, was officially born in 2009 at a Belgian conference. The meeting was convened as a response to tensions between two facets of tech organizations that historically experienced deep divisions. Software developers needed to move fast and experiment often, while Operations teams prioritized stability and availability of services (these are the people who keep servers running day in and day out). Their goals were not only opposing, they were competing.
That sounds awfully reminiscent of today’s data science. Data scientists create value by experiments: new ways of modeling, combining, and transforming data. Meanwhile, the organizations that employ data scientists are incentivized for stability.
The consequences of this division are profound: in the latest Anaconda “State of Data Science” report, “fewer than half (48%) of respondents feel they can demonstrate the impact of data science” on their organization. By some estimates, the vast majority of models created by data scientists end up stuck on a shelf. We don’t yet have strong practices for passing models between the teams that create them and the teams that deploy them. Data scientists and the developers and engineers who implement their work have entirely different tools, constraints, and skill sets.
DevOps emerged to combat this sort of deadlock in software, back when it was developers vs. operations. And it was tremendously successful: many teams have gone from deploying new code every few months to several times a day. Now that we have machine learning vs. operations, it’s time to think about MLOps — principles from DevOps that work for data science.
Introducing Continuous Integration
DevOps is both a philosophy and a set of practices, including:
-
Automate everything you can
-
Get feedback on new ideas fast
-
Reduce manual handoffs in your workflow
In a typical data science project, we can see some applications:
-
Automate everything you can. Automate parts of your data processing, model training, and model testing that are repetitive and predictable.
-
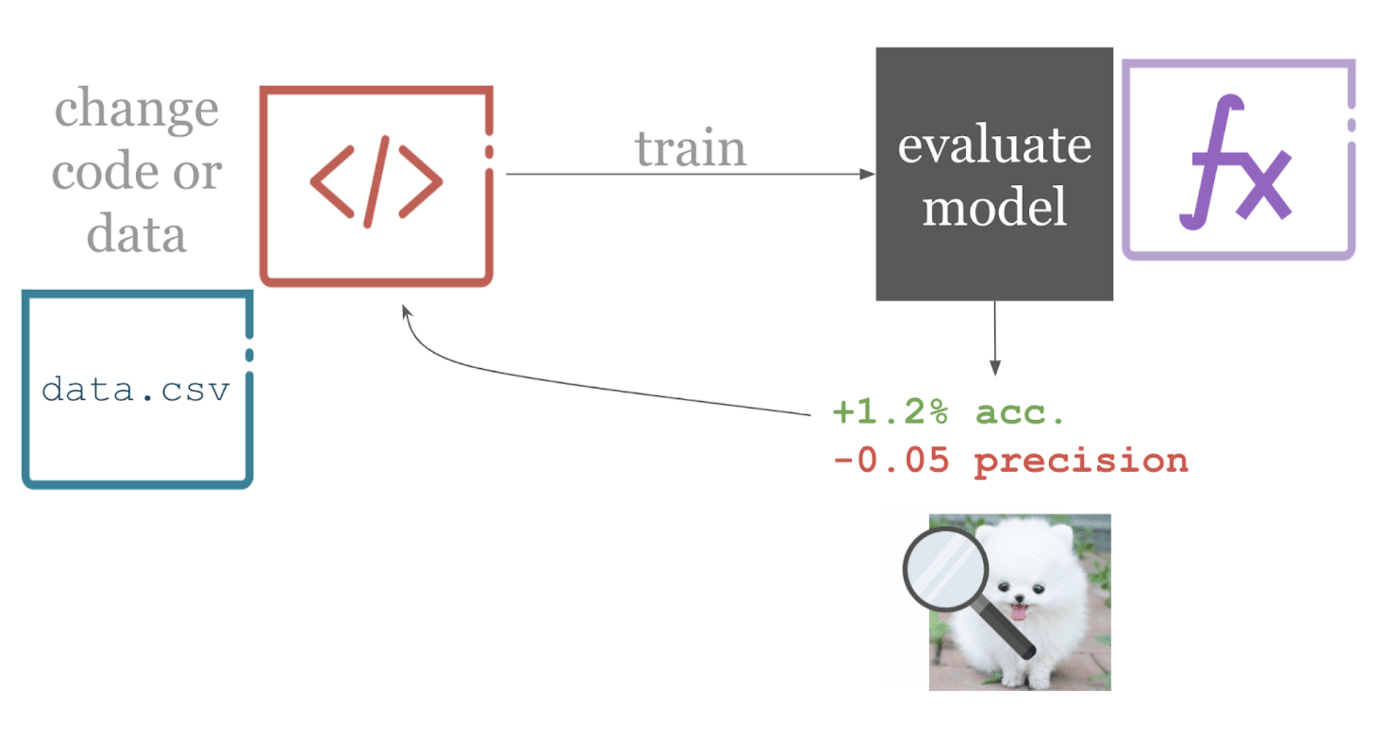
Get feedback on new ideas fast. When your data, code, or software environment changes, test it immediately in a production-like environment (meaning, a machine with the dependencies and constraints you anticipate having in production).
-
Reduce manual handoffs in your workflow. Find opportunities for data scientists to test their own models as much as possible. Don’t wait until a developer is available to see how the model will behave in a production-like environment.
The standard DevOps approach for accomplishing these goals is a method called continuous integration (CI).
The gist is that when you change a project’s source code (usually, changes are registered via git commits), your software is automatically built and tested. Every action triggers feedback. CI is often used with Git-flow, a development architecture in which new features are built on Git branches (need a Git refresher? Try this). When a feature branch passes the automated tests, it becomes a candidate to be merged into the master branch.

With this setup, we have automation — code changes trigger an automatic build followed by testing. We have fast feedback, because we get test results back quickly, so the developer can keep iterating on their code. And because all this happens automatically, you don’t need to wait for anyone else to get feedback — one less handoff!
So why don’t we use continuous integration already in ML? Some reasons are cultural, like a low crossover between data science and software engineering communities. Others are technical- for example, to understand your model’s performance, you need to look at metrics like accuracy, specificity, and sensitivity. You might be assisted by data visualizations, like a confusion matrix or loss plot. So pass/fail tests won’t cut it for feedback. Understanding if a model is improved requires some domain knowledge about the problem at hand, so test results need to be reported in an efficient and human-interpretable way.
How do CI systems work?
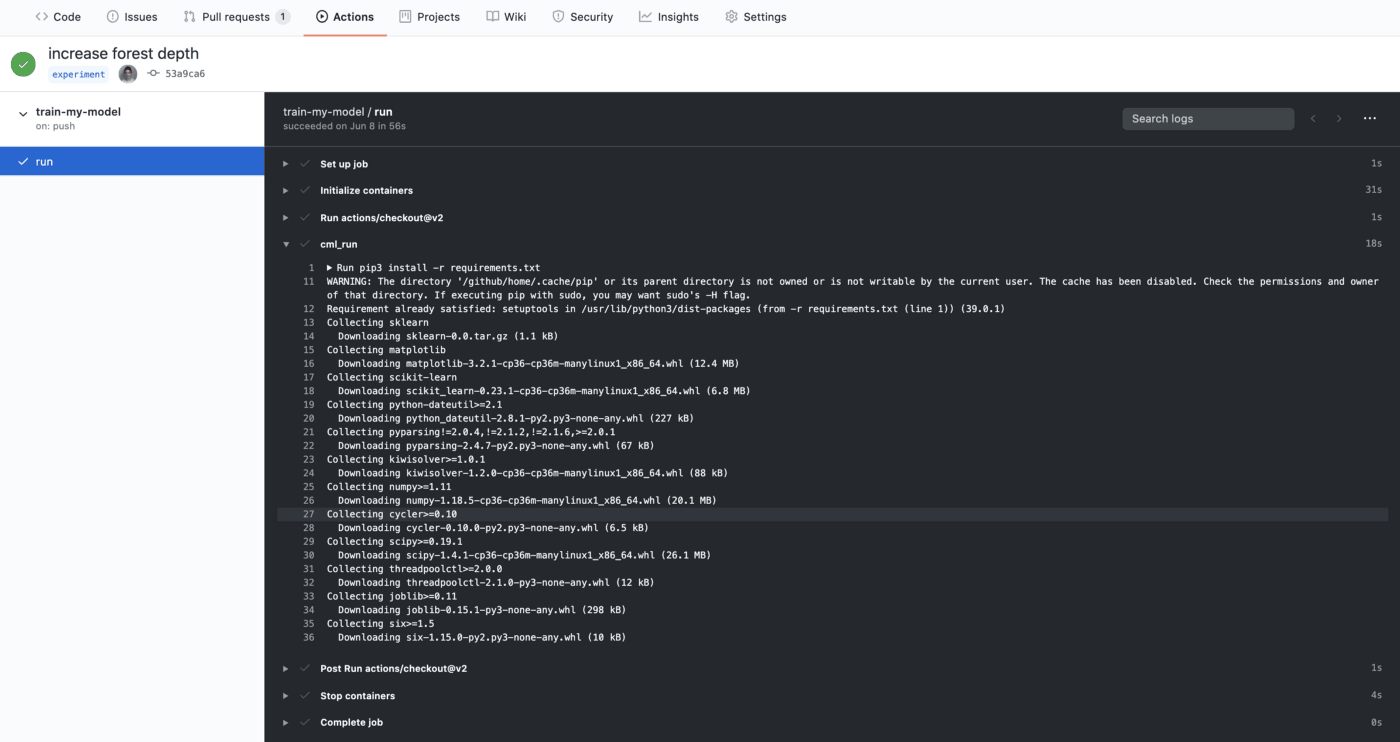
Now we’ll get even more practical. Let’s take a look at how a typical CI system works. Luckily for learners, the barrier has never been lower thanks to tools like GitHub Actions and GitLab CI- they have clear graphical interfaces and excellent docs geared for first-time users. Since GitHub Actions is completely free for public projects, we’ll use it for this example. It works like this:
- You create a GitHub repository. You create a directory called
.github/workflows, and inside, you place a special.yamlfile with a script you want to run- like,
$ python train.py- You change the files in your project repository somehow and Git commit the change. Then, push to your GitHub repository.
# Create a new git branch for experimenting
$ git checkout -b "experiment"
$ edit train.py

# git add, commit, and push your changes
$ git add . && commit -m "Normalized features"
$ git push origin experiment-
As soon as GitHub detects the push, GitHub deploys one of their computers to run the functions in your
.yaml. -
GitHub returns a notification if the functions ran successfully or not.

That’s it! What’s really neat here is that you’re using GitHub’s computers to run your code. All you have to do is update your code and push the change to your repository, and the workflow happens automatically.
Back to that special .yaml file I mentioned in Step 1- let’s take a quick look
at one. It can have any name you like, as long as the file extension is .yaml
and it’s stored in the directory .github/workflows. Here’s one:
# .github/workflows/ci.yaml
name: train-my-model
on: [push]
jobs:
   run:
      runs-on: [ubuntu-latest]
   steps:
      - uses: actions/checkout@v2
      - name: training
      run: |
         pip install -r requirements.txt
         python train.py
There’s a lot going on, but most of it is the same from Action to Action- you
can pretty much copy and paste this standard GitHub Actions template, but fill
in your workflow in the run field.
If this file is in your project repo, whenever GitHub detects a change to your
code (registered via a push), GitHub Actions will deploy an Ubuntu runner and
attempt to execute your commands to install requirements and run a Python
script. Be aware that you have to have the files required for your workflow —
here, requirements.txt and train.py — in your project repo!
Get better feedback
As we alluded to earlier, automatic training is pretty cool and all, but it’s important to have the results in a format that’s easy to understand. Currently, GitHub Actions gives you access to the runner’s logs, which are plain text.
But understanding your model’s performance is tricky. Models and data are high dimensional and often behave nonlinearly — two things that are especially hard to understand without pictures!
I can show you one approach for putting data viz in the CI loop. For the last few months, my team at Iterative.ai has been working on a toolkit to help use GitHub Actions and GitLab CI for machine learning projects. It’s called Continuous Machine Learning (CML for short), and it’s open source and free.
Working from the basic idea of, “Let’s use GitHub Actions to train ML models,”, we’ve built some functions to give more detailed reports than a pass/fail notification. CML helps you put images and tables in the reports, like this confusion matrix generated by SciKit-learn:

To make this report, our GitHub Action executed a Python model training script, and then used CML functions to write our model accuracy and confusion matrix to a markdown document. Then CML passed the markdown document to GitHub.
Our revised .yaml file contains the following workflow:
name: train-my-model
on: [push]
jobs:
  run:
    runs-on: [ubuntu-latest]
    container: iterativeai/cml:0-dvc2-base1
    steps:
      - uses: actions/checkout@v2
      - name: training
        env:
          repo_token: ${{ secrets.GITHUB_TOKEN }}
        run: |
          # train.py outputs metrics.txt and plot.png
          pip3 install -r requirements.txt
          python train.py

          # copy the contents of metrics.txt to our markdown report
          cat metrics.txt >> report.md

          # add our confusion matrix to report.md
          cml publish plot.png --md >> report.md

          # send the report to GitHub for display
          cml send-comment report.md
You can see the entire project repository here. Note that our .yaml now contains a few more configuration details, like a special Docker container and an environmental variable, plus some new code to run. The container and environmental variable details are standard in every CML project, not something the user needs to manipulate, so focus on the code!
With the addition of these CML functions to the workflow, we’ve created a more complete feedback loop in our CI system:
-
Make a Git branch and change your code on that branch.
-
Automatically train model and produce metrics (accuracy) and a visualization (confusion matrix).
-
Embed those results in a visual report in your Pull Request.
Now, when you and your teammates are deciding if your changes have a positive effect on your modeling goals, you have a dashboard of sorts to review. Plus, this report is linked by Git to your exact project version (data and code) AND the runner used for training AND the logs from that run. Very thorough! No more graphs floating around your workspace that have long ago lost any connection to your code!
So that’s the basic idea of CI in a data science project. To be clear, this example is among the simplest way to work with CI. In real life, you’ll likely encounter considerably more complex scenarios. CML also has features to help you use large datasets stored outside your GitHub repository (using DVC) and train on cloud instances, instead of the default GitHub Actions runners. That means you can use GPUs and other specialized setups.
For example, I made a project using GitHub Actions to deploy an EC2 GPU and then train a neural style transfer model. Here’s my CML report:
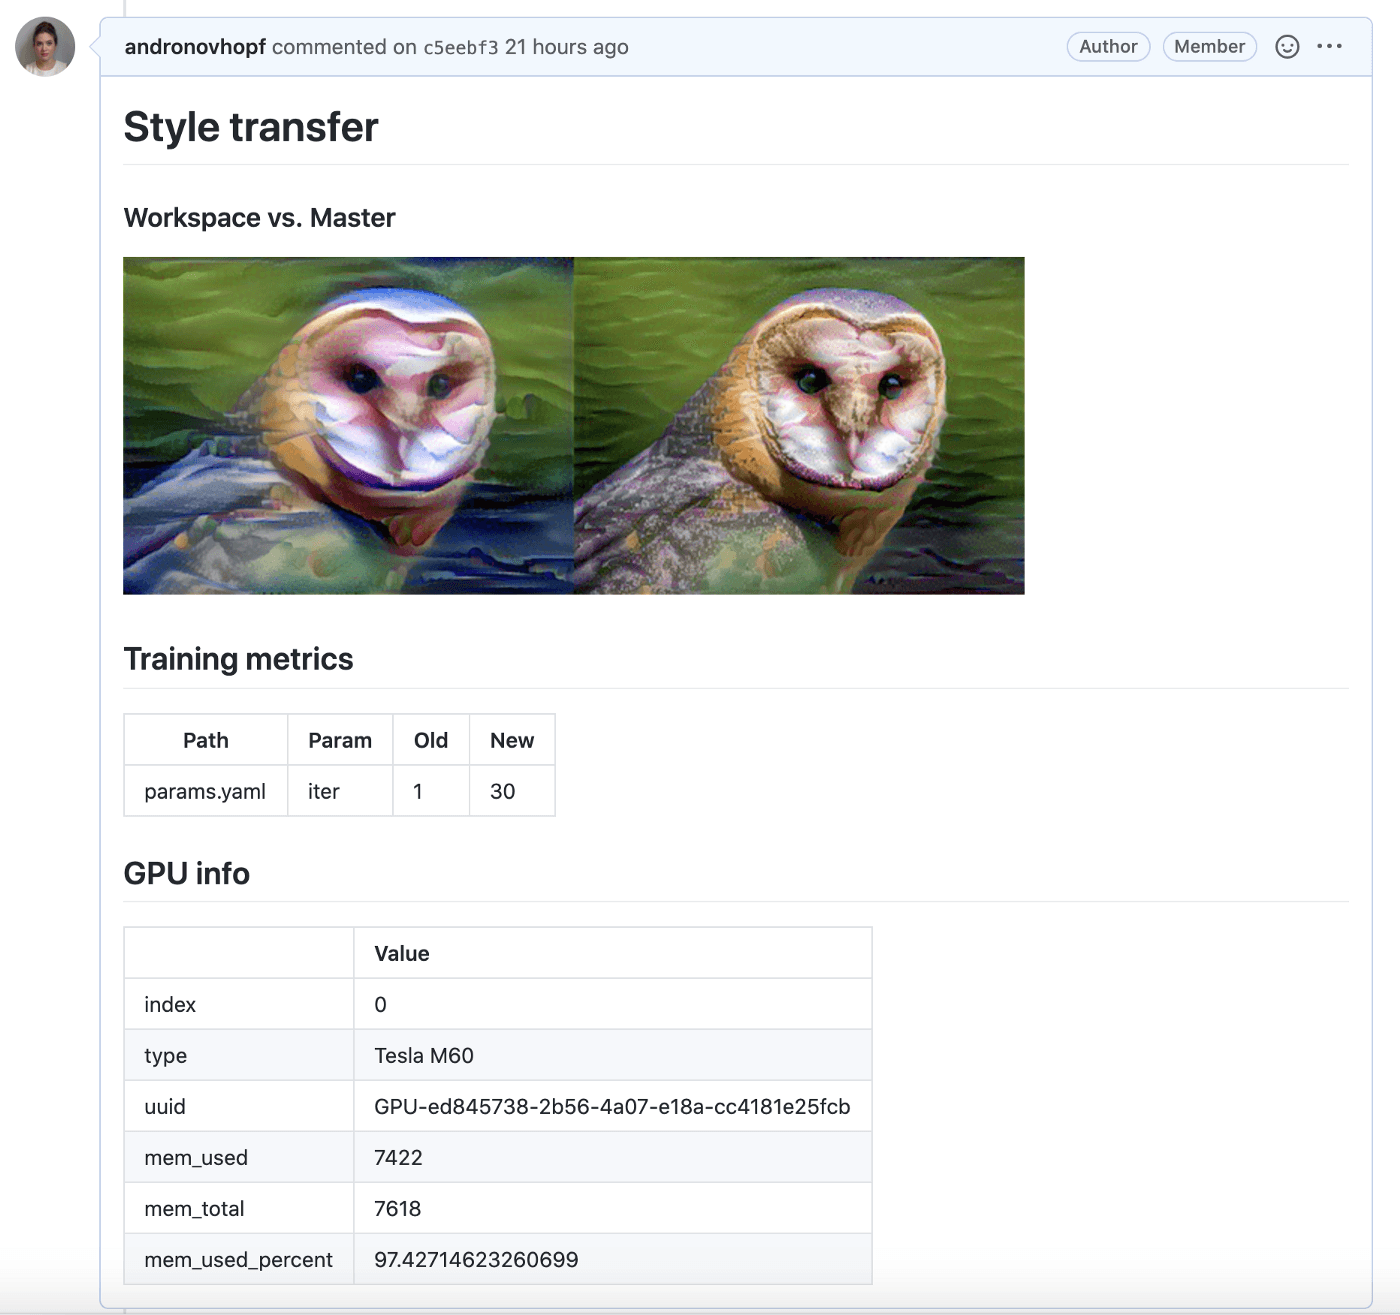
You can also use your own Docker containers, so you can closely emulate the environment of a model in production. I’ll be blogging more about these advanced use cases in the future.
Final thoughts on CI for ML
To summarize what we’ve said so far:
DevOps is not a specific technology, but a philosophy and a set of principles and practices for fundamentally restructuring the process of creating software. It’s effective because it addresses systemic bottlenecks in how teams work and experiment with new code.
As data science matures in the coming years, people who understand how to apply DevOps principles to their machine learning projects will be a valuable commodity — both in terms of salary and their organizational impact. Continuous integration is a staple of DevOps and one of the most effective known methods for building a culture with reliable automation, fast testing, and autonomy for teams.
CI can be implemented with systems like GitHub Actions or GitLab CI, and you can use these services to build automatic model training systems. The benefits are numerous:
-
Your code, data, models, and training infrastructure (hardware and software environment) are Git versioned.
-
You’re automating work, testing frequently and getting fast feedback (with visual reports if you use CML). In the long run, this will almost certainly speed up your project’s development.
-
CI systems make your work is visible to everyone on your team. No one has to search very hard to find the code, data, and model from your best run.
And I promise, once you get into the groove, it is incredibly fun to have your model training, recording, and reporting automatically kicked off by a single git commit.
You will feel so cool.
Further reading
-
Continuous Integration, the seminal Martin Fowler blog on the subject
-
Continuous Delivery for Machine Learning, another excellent blog on Martin Fowler’s site about building a continuous integration & continuous delivery system for ML
-
The DevOps Handbook, a beloved guide that is recommended for nearly any organization (ML, software, or not)
Note: This article has been cross-posted on Medium.